wordpress网站linux和win主机URL伪静态设置方法详解
做伪静态是能够更好的利于网站的SEO优化。
目前大部分网站的搭建都是采用动态网页技术实现的,然而现阶段的搜索引擎对于动态的网站抓取效果并不是很好,所以你经常会听到说搜索引擎不喜欢动态的链接,也就是在url中带有“?”的网址,那么怎么修改这种动态的url格式呢?
一般我们采用的方法是url伪静态设置,就是让链接看起来像是静态的,比如xxx.com/1.html这种格式,wordpress搭建的网站实现伪静态有两种不同的情况,和我们使用的空间有很大的关系,linux或unix系统的服务器中能够很好的实现这种伪静态的效果,但是windows系统的IIS中设置伪静态会在前面加上index.php,所以无法实现真正的伪静态功能,下面分别演示这两种空间的实现方法:
linux/unix主机的伪静态实现方法:
1、进入wordpress网站后台依次 》设置 》固定连接;
2、选择自定义,填写格式为:/%post_id%.html 即可,如下图:
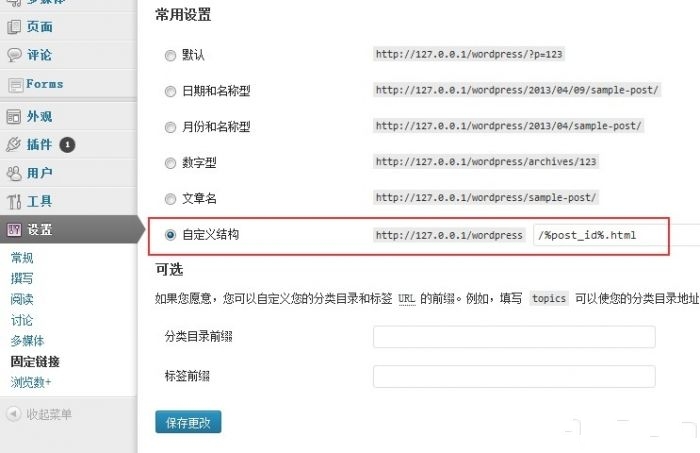
这样就可以把文章的格式修改为 xxx.com/123.html 的格式了,如果你想让你的链接看起来更有层次感,可以使用以下格式,让链接现属于分类目录,然后再显示文章ID地址:
/%category%/%post_id%.html
win主机的伪静态实现方法:
win主机下的wordpress文章的链接都是http://www.xxx.com/index.php/123.html类似的链,
中间的index.php异常明显
这里介绍两种方法
第一种:用404.php实现伪静态
1、进入WP后台,【设置】–【固定连接】里面,先把固定连接选择自定义,设置成/%post_id%.html。
2、新建个404.php页面复制下面的404.php页面代码保存后用FTP上传到网站根目录下,然后在虚拟主机控制面板里面修改404跳转页面为刚才上传的404.php,这样就可以实现伪静态了。
404.php页面中加入代码如下:
<?php
// This is the default file for the site. Usually index.php
$default = ‘index.php’;
// The name of this file.
// Set this value for the URL in Custom Error Properties of your website in IIS.
// Goto: IIS Manager > Websites > [Site Name] > Properties > Custom Errors >
// 404 & 404;2 & 404;3 > URL (Requires a ‘/’ prefix in IIS).
$thisfile = ‘404-handler.php’;
$_SERVER[‘ORIG_PATH_TRANSLATED’] = str_replace($thisfile, $default, $_SERVER[‘ORIG_PATH_TRANSLATED’]);
$_SERVER[‘SCRIPT_FILENAME’] = str_replace($thisfile, $default, $_SERVER[‘SCRIPT_FILENAME’]);
$_SERVER[‘ORIG_PATH_INFO’] = str_replace($thisfile, $default, $_SERVER[‘ORIG_PATH_INFO’]);
$_SERVER[‘SCRIPT_NAME’] = str_replace($thisfile, $default, $_SERVER[‘SCRIPT_NAME’]);
$_SERVER[‘PHP_SELF’] = str_replace($thisfile, $default, $_SERVER[‘PHP_SELF’]);
$_SERVER[‘PATH_INFO’] = false;
$qs =& $_SERVER[‘QUERY_STRING’];
$ru =& $_SERVER[‘REQUEST_URI’];
$pos = strrpos($qs, ‘://’);
$pos = strpos($qs, ‘/’, $pos + 4);
$_SERVER[‘URL’] = $ru = substr($qs, $pos);
$qs = trim(stristr($ru, ‘?’), ‘?’);
// Required for WordPress 2.8+
$_SERVER[‘HTTP_X_ORIGINAL_URL’] = $ru;
// Fix GET vars
foreach ( $_GET as $var => $val ) {
if ( substr($var, 0, 3) == ‘404’) {
if ( strstr($var, ‘?’) ) {
$newvar = substr($var, strpos($var, ‘?’) + 1);
$_GET[$newvar] = $val;
}
unset($_GET[$var]);
}
break;
}
include($default);
?>
第二种:首先你的主机要装Rewrite 组件,现在国内很多WINDOWS主机都有装这个了。
使用方法:先在本地新建一个 txt 文本文件,把名字重命名为 httd.ini,然后复制下面的代码粘贴到你新建的 httd.ini 文件中保存,直接用FTP上传到你的网站的根目录。然后去WP后台设置固定连接:/%post_id%.html
httpd.ini 中加入如下代码如下:
[ISAPI_Rewrite]
# 3600 = 1 hour
CacheClockRate 3600
RepeatLimit 32
# Protect httpd.ini and httpd.parse.errors files
# from accessing through HTTP
# Rules to ensure that normal content gets through
RewriteRule /sitemap.xml /sitemap.xml [L]
RewriteRule /favicon.ico /favicon.ico [L]
# For file-based wordpress content (i.e. theme), admin, etc.
RewriteRule /wp-(.*) /wp-$1 [L]
# For normal wordpress content, via index.php
RewriteRule ^/$ /index.php [L]
RewriteRule /(.*) /index.php/$1 [L]
同样也可以实现伪静态,相对而言,第二种方法更好。
如果用了第二种方法导致百度地图链接打不开请添加以下两句代码:
RewriteRule /sitemap.html /sitemap.html [L]
RewriteRule /sitemap_baidu.xml /sitemap_baidu.xml [L]
第三种方式:另外一个比较具体的写法,如果用第二个有问题,可以尝试这个
[ISAPI_Rewrite]
# 3600 = 1 hour
CacheClockRate 3600
RepeatLimit 32
# Protect httpd.ini and httpd.parse.errors files
# from accessing through HTTP
# wordpress 伪静态规则
# For tag(中文标签以及标签翻页的规则)
RewriteRule /tag/(.*)/page/(\d+)$ /index\.php\?tag=$1&paged=$2
RewriteRule /tag/(.+)$ /index\.php\?tag=$1
# For category(中文分类以及分类翻页的规则)
RewriteRule /category/(.*)/page/(\d+)$ /index\.php\?category_name=$1&paged=$2
RewriteRule /category/(.*) /index\.php\?category_name=$1
# For sitemapxml
RewriteRule /sitemap.xml /sitemap.xml [L]
RewriteRule /sitemap.html /sitemap.html [L]
RewriteRule /sitemap_baidu.xml /sitemap_baidu.xml [L]
RewriteRule /favicon.ico /favicon.ico [L]
# For file-based wordpress content (i.e. theme), admin, etc.
RewriteRule /wp-(.*) /wp-$1 [L]
# For normal wordpress content, via index.php
RewriteRule ^/$ /index.php [L]
RewriteRule /(.*) /index.php/$1 [L]
原创文章转载请注明:转载自 七行者博客
本文固定链接: https://www.qxzxp.com/3547.html
感谢博主啊,之前一直伪静态做不了,原来是之前代码写错了,现在终于解决了。
2013-10-14 23:34